Create Remote Development Server
- Introduction
- Create Droplet
- Docker
- Non-Root User
- OpenSSH
- OpenSSH - Keys
- Node
- Nginx
- UFW
- Rsync
- Conclusion
There are circumstances when your local machine is not suitable for heavy processing or its operating system is incompatible with your target environment. In this case, your need to process your source code in an environment that is different than your local machine. This article examines the use of remote development server using DigitalOcean.
There is nothing new in having data stored in one system and having it processed in another. While conceptually everything is very clear, the implementation details can greatly vary. This article focuses on the so-called conventional server where there is no abstract layer between the OS itself and the tools used to process source code.
The setup will consist of the following:
- DigitalOcean
- Ubuntu 20.04 LTS
- OpenSSH
- Node
- Nginx
- rsync
- fswatch
Sign-up on DigitalOcean and create a droplet. Choose a password-based authentication as we will configure SSH keys later in this article. If you choose to use the SSH key, you would need to manually set root password otherwise you would require a root password reset.
As mentioned in the beginning, choose Ubuntu distro version 20.04 LTS (why Docker was not chosen is explained below). Choose droplet specs according to your workload needs. Other settings can be left with their default value. Choose a data center close to your physical location otherwise you might encounter poor SSH performance.
By default, your Ubuntu droplet starts with a root user. You may use it to configure the OS initially. Alternatively, you can grant sudo to your non-root user to complete the configuration.
Afterward, a non-root user should be used for development operations. It is a very bad practice to use a root user as an everyday user in your development server.
Update your Ubuntu installation after it is up by running:
apt-get update && apt-get -y upgrade
Initially, I was planning on using Docker for this project. However, I ran into one specific technical detail: Docker containers exit on non-zero error. In the scope of this project, this presented a difficulty in keeping Docker containers running as, for example, a linting tool would exit with a non-zero exit code if there was an issue. While it is very possible to find a solution and keep Docker containers running, I had no hard requirement to use docker. Hence I have decided to create a "conventional" or "traditional" development server.
We will create a non-root user which we will use to sync source code from our local machine to remote. We will also use the same user to execute any developer tools or scripts. As mentioned in the beginning, using root for everyday work is a very bad habit (example explanation).
To create a new user, simply run: adduser --home /home/developer --shell /bin/bash developer This command will create a new user called developer whose home directory is at /home/developer and default shell as Bash (/bin/bash). Note that this is an interactive command so you will need to supply a password and some other (trivial) information.
Then we will set its primary user group as www-data. This is required for Nginx to be able to serve files. To do that, run: usermod -g www-data developer
To verify that you have successfully run these commands, do this: id developer Example of successful outcome: uid=1001(developer) gid=33(www-data) groups=33(www-data). Bracket value of uid shows the username and the bracket value of gid shows the name of the primary group. The first value should be developer and the second value should www-data.
To run elevated commands, you need to add your non-root user to the sudo group to run elevated commands. DigitalOcean published an excellent article on how to do this but here is a quick summary. First, run the following code to add user developer to the sudo group: usermod -aG sudo developer
To verify that your non-root user was successfully added to the sudo group, run: su - developer. This command "switches" into sudo mode of that user instead of running a specific command via sudo. To exit, simply type exit and you will be back to root user session. More information on this command is available here.
Troubleshooting tips for beginners
- If you made a typo, you can delete a user:
deluser --remove-home username groupdel username - Hint: the second command is required to remove the old primary group
- Confirm the user deletion:
getent passwd username - Confirm the primary group deletion:
getent group username - Hint: if the entry is deleted,
getentwill return nothing
Once your droplet is up and running, it is time to configure SSH keys to allow password-less authentication. Ubuntu droplet image comes pre-installed with OpenSSH so there is no need to install it.
Using SSH keys with a running ssh-agent allows you to cache passphrase so you need to enter it only once for each new Bash session. For security reasons, it is better to separate the account password from SSH key passphrase.
Now we will generate an SSH key pair (public and private) on your local machine and add it to your droplet to allow a password-less connection.
This tutorial from DigitalOcean contains step-by-step explanations of how to do it. When following the tutorial from DigitalOcean, bear in mind that you need to set up SSH access for the developer user, not the root user. In other words, when copying the public key to remote, replace destination ~ with /home/developer/.ssh.
Note that command ssh-copy-id is not suitable for setting up keys for other users. As the syntax of the command is ssh-copy-id … user@host, the public key will be copied to the account user. Switch -i is for specifying a non-default key, not a different user.
You will also need to create an SSH entry with a custom hostname in your config. This is required for rsync Bash script which we will use to copy modified source code from local to remote. SSH config is typically located at: ~/.ssh/config.
See this tutorial from DigitalOcean and OpenSSH man page for more details. Bear in mind that the sample config below contains AddKeysToAgent which is a Mac-specific setting.
Host dev
  HostName <ip>
  User <user>
  PreferredAuthentications publickey
  AddKeysToAgent yes
  UseKeychain yes
  IdentityFile ~/.ssh/<user>
Before logging out, make sure your root account has been set with a password. Root access can be very valuable if your OOBM stops functioning. For example, DigitalOcean provides console access. To set a password, simply execute: passwd when logged in as root. Alternatively, you may need to reset the root password.
Key points if you are a beginner
- By default,
ssh-keygenwill generate keys in the current folder - Typically, you store SSH keys in
~/.ssh/so navigate to that directory first - You need to add a private key to
ssh-agentbefore attempting a connection - To start your ssh-agent, do:
eval "$(ssh-agent -s)" - To automatically start ssh-agent, add the line above to your profile script
- To add SSH key, run:
ssh-add private_key - You can automatically add SSH keys (see sample SSH config above)
Config information for beginners
- The information below relates to droplet
- Quick file reference:
- *Do not confuse
sshd_configwithssh_config: sshd_configis for connecting to this host (this droplet)ssh_configis for connecting to other hosts from the droplet- Disable your root SSH connection (explained below):
PermitRootLogin no
Initial root password
Accessing root over SSH is a dangerous security practice (details).
At the beginning of this article, I have mentioned choosing password-based authentication instead of SSH key when creating a new droplet. I have done so with the following two assumptions in mind:
- separate article into clear sub-sections to help beginners
- this is an explorative article, not an authoritative guide
Troubleshooting steps
- Run to check if your private SSH key was added or not:
ssh-add -l - Troubleshoot SSH connection locally:
ssh -v user@host - Troubleshoot SSH connection remotely:
- Make sure you set correct permissions:
Node will be installed using Snap. First, determine which version of Node you need to run. You can do so by running: snap info node. Then you can install Node by running: snap install node --classic --channel <node_version> For example: snap install node --classic --channel 14/stable
You can confirm the installed Node version by running: node --version. If you installed the wrong Node version, first uninstall it by running: snap remove node. Then proceed to install the desired version following previous instructions.
Canonical published an excellent step-by-step tutorial on installing Nginx in Ubuntu.
Canonical article tells you to create your website config in sites-enabled/ directory. Alternatively, you can create your site config in sites-available/ and symlink it to sites-enabled/. This way you can easily enable/disable site config. When you create a symlink, you must use an absolute path: ln -s /etc/nginx/sites-available/site_config /etc/nginx/sites-enabled/
Canonical article tells you to restart nginx whenever you make config modification via service nginx restart. Alternatively, you may simply reload config instead which is considered a safer option (more details here): service nginx reload
server {
  listen 80;
  listen [::]:80;

  root /home/developer/repo/dist;

  location / {
    index index.html;
  }

  #error_log /var/log/nginx/debug.log debug;

  server_name my-domain.com www.my-domain.com;
}
If you do not have a registered domain, you can still use the domain name but with certain limitations. You need to modify your hosts file to point your domain name to your droplet's IP address. For example: 1.2.3.4 my-domain.com
1.2.3.4 www.my-domain.com
The limit lies in the fact that others will not be able to use the same domain name unless they also modify their hosts file. For the exact location of the hosts file, please consult this document as its location varies per operating system.
Do Not Use .dev TLD
Quick information for beginners
- Quick commands reference:
- Quick file reference:
Nginx and Permissions
- Web content directory (root directive) needs to have:
- Otherwise, you will run into 403 permission denied error
Troubleshooting steps for beginners
- If you run into various HTTP errors, enable debugging for more info
- Set (or uncomment) the following line in your site config:
error_log /var/log/nginx/debug.log debug - If this logging level is too verbose, you can change it to other values
- When specifying a path for root directive, you need to use an absolute path
Any server, even a private one, should maintain a certain level of security. Having a firewall is one of those measurements. DigitalOcean image of Ubuntu has UFW disabled by default. Before enabling UFW, you need to permit SSH (and other) ports otherwise your SSH connection will drop. To allow SSH connections, run: ufw allow OpenSSH
If you use non-standard SSH port (i.e. not 22), follow this tutorial from DigitalOcean. Since we will also require Nginx connection, permit that as well by running: ufw allow "Nginx Full"
As you have noticed, if the app name has a space in it, you need to enclose it in quotes. To view a list of existing application profiles, run: ufw app list
Note that these are pre-configured profiles that assume default ports. If you use non-standard ports, refer to the previously linked DigitalOcean tutorial. To enable UFW, run: ufw enable
In case something goes wrong, you always have OOBM access via console in DigitalOcean.
Troubleshooting tips for beginners
- To disable UFW:
ufw disable - Reset (delete all rules):
ufw reset - To delete a rule:
ufw delete rule - For example:
ufw delete allow OpenSSH
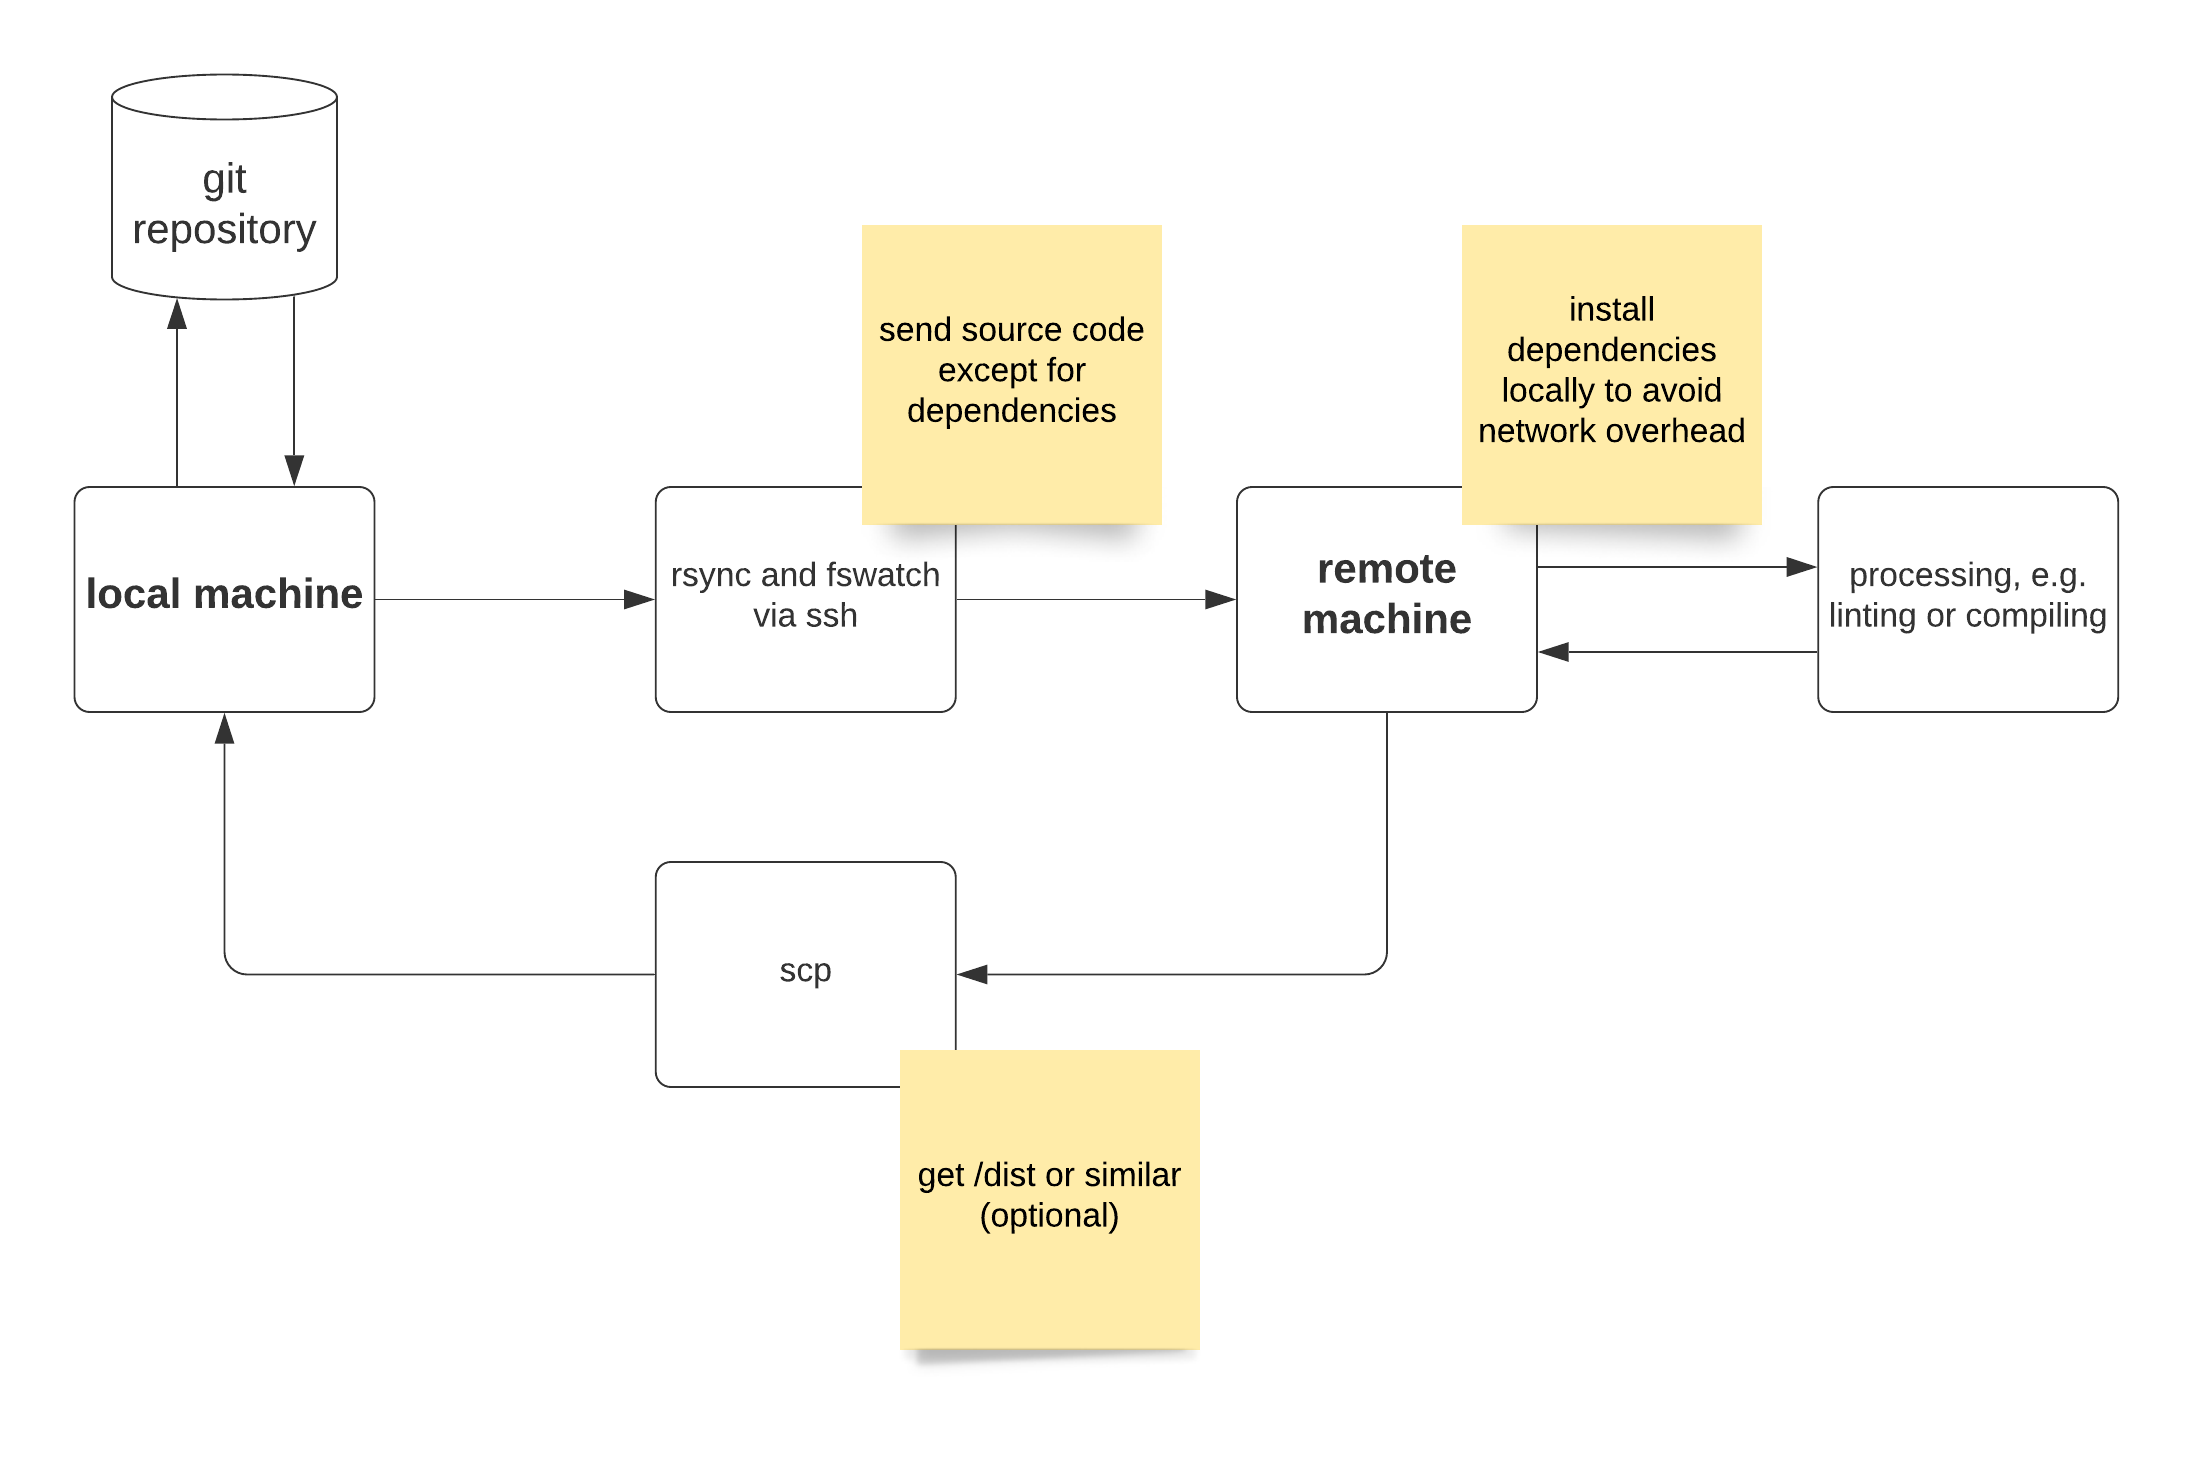
To synchronize source code from local to remote, a custom Bash script is used which uses rsync and fswatch. To make this setup Windows-compatible, you would need to use Cygwin (or similar).
The idea behind this script is simple. Watch the source code folder (typically repository) for changes. When a local change is detected, send modified files to remote.
Download the script from this repository. The repository is intended to be used as a git sub-module. Given the long repository name, it is better to clone it into a folder such as dev-server.
To start watching for file(s) changes, run: ./dev-server/watch.sh
If you want to do one-off sync with the remote, run: ./sync.sh
If you want to copy compiled files from a folder such as dist/, run: scp dev:repo/dist/index.html .
Or you can run the following to copy (recursively) the entire folder: scp -r dev:repo/dist/ .
This Bash script makes several assumptions which are listed here. Installation of development dependencies should be done directly on the droplet to avoid network overhead (use SSH). Make sure to set correct permissions for the web content folder as described in the Nginx section.
Troubleshooting tips for beginners
If you run into permission errors, remove directory /home/developer/repo (droplet) using sudo (or root account) and re-run sync script.
In this article, I have provided a pragmatic approach towards moving source code compilation from your local machine to a remote one. This should not be confused with a continuous integration server as it is an entirely different concept.
In part two I will be looking at automating the provisioning of the remote development server using DigitalOcean meta-data and cloud-config. This will allow the ephemeral treatment of the droplet instance.
This way you can spin droplets up and down as needed as they will be configured automatically. You would be able to use more expensive droplets daily without incurring a full month's expense.
As explained in the beginning, this is not an alternative suggestion to Docker but rather a way to replace your local development processing with remote. This article does not claim to be authoritative but rather aims to be explorative.